Once enabled, the Desktop File Incinerator is integrated with Windows and an Incinerator icon displays on your desktop. DriveScrubber does not need to be open to use this feature.
The items you send to the Incinerator remain there until you decide to securely delete them, or restore them back to their original location. For instruction on:
Sending files to the Incinerator, see Send files to the Incinerator below.
Incinerating contents of the Incinerator, see Incinerate files and folders below.
Restoring Incinerator items, see Restore files and folders below.
Files can be sent to the Incinerator in several ways.
Use a standard drag-and-drop operation to move files and folders to the Incinerator desktop icon.
A Confirmation message displays to confirm that you wish to send the item or items to the Incinerator. Click Yes to complete the process.
![]() Note: This
right-click functionality is available when the Add
"Send to Incinerator" to right-click menus check box
is selected during configuration.
The check box is selected as a default.
Note: This
right-click functionality is available when the Add
"Send to Incinerator" to right-click menus check box
is selected during configuration.
The check box is selected as a default.
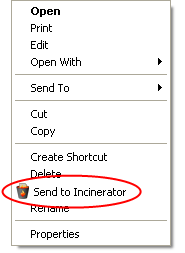
In Windows (such as through Windows Explorer), right-click on the folder or file you want to incinerate. You can also select multiple items as you normally would in Windows, and then right-click.
Click Send to Incinerator from the right-click menu. Click to view an example.
A Confirmation message displays to confirm that you wish to send the item or items to the Incinerator. Click Yes to complete the process.
![]() Note: This
right-click functionality is available when the Add
Incinerator to "Send To..." menu check box is selected
during configuration.
The check box is selected as a default.
Note: This
right-click functionality is available when the Add
Incinerator to "Send To..." menu check box is selected
during configuration.
The check box is selected as a default.
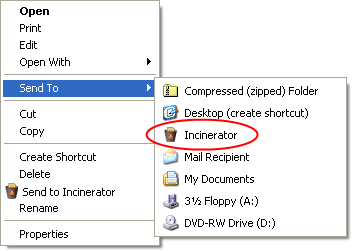
In Windows (such as through Windows Explorer), right-click on the folder or file you want to incinerate. You can also select multiple items as you normally would in Windows, and then right-click.
Click Send To from the right-click menu.
Click Incinerator from Send To submenu. Click to view an example.
A Confirmation message displays to confirm that you wish to send the item or items to the Incinerator. Click Yes to complete the process.
![]()
Items that you send to the File Incinerator remain there until you decide to permanently and securely delete them. To securely delete Incinerator items:
Open the Incinerator (either double-click on the desktop icon or select it in Windows Explorer).
To securely delete:
Selected items: Select the item you want to incinerate and click Incinerate this item (You can also select multiple items as you normally would in Windows.)
All items in the Incinerator: Click Incinerate all items.
A Confirmation message displays to confirm that you wish to permanently delete the items or items. Click Yes to complete the incineration.
![]()
Items that you send to the File Incinerator remain there until you decide to permanently and securely delete them. To restore Incinerator items to their original location:
Open the Incinerator (either double-click on the desktop icon or select it in Windows Explorer).
Select the item you want to restore and click Restore this item (You can also select multiple items as you normally would in Windows.)
The restored items will be moved back to their original location.